This article has been put together as a result of trying to upgrade an aging Fujitsu Siemens Celsius 650 PIII desktop computer. Although is this now a rather old desktop, it’s been doing sterling work as a 24-7 server for a radio station for some years, until the hard drive finally failed. In attempting to get this running again, I hit a number of brick walls, so I’ve put this together s a guide to help anyone who’s had a similar experience. If this has been helpful, please add a comment below
Accessing the BIOS setup
On boot, the Celsius 650 gives you an option to boot, or to enter setup. Trying to enter setup threw up a prompt for an administrator password… that I didn’t know. All attempts at finding it failed, as did an online search for a default BIOS password for the Celsius 650. In the end, it was a case of resetting the BIOS and starting again, and even this wasn’t easy.
Resetting the BIOS
To reset the BIOS (wiping any settings including the BIOS Administration password, it’s a case of altering the position of a jumper. The jumper in question is J1F2 on the motherboard. To reset the BIOS, move the jumper from pins 1 and 2, to pins 2 and 3, then power up the machine. The following pics may help:
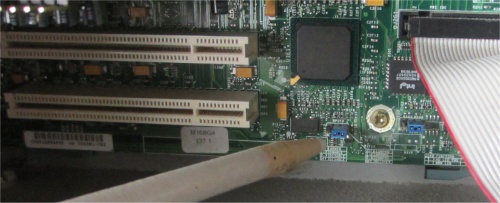
Fujitsu Siemens Celsius 650 BIOS Jumper
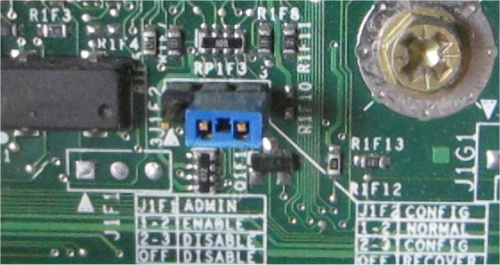
Fujitsu Siemens Celsius 650 BIOS Jumper (Close-up)
Once the BIOS jumper had been swapped, it was easy to do in and disable the Admin password from the BIOS Security tab, pictured here:
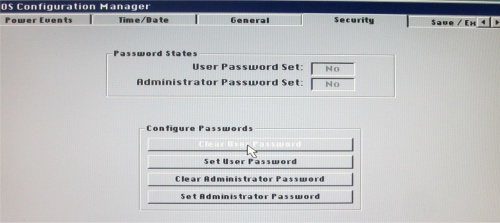
Fujitsu Siemens Celsius 650 BIOS Security Screen
Installing a SATA drive
Before you read any further – note that the following did not work. I gave up, and found an IDE drive instead. I’ve left it here in case it helps anyone else.
With new IDE drives increasingly hard to find, I was forced to by a SATA drive for our Celsius 650 – The motherboard, of course, can’t cope with a SATA drive, as it’s only equipped with IDE, but the drive I opted for had an IDE-to-SATA connector card. This plugs into one of the two IDE ports and then onto the data socket on the new SATA hard drive.
Note that our connector card and the drive need their own power supply (using the standard 4-pin MOLEX connectors) – Our card didn’t come with a second MOLEX adapter, so a trip to local UK electronics store Maplin was needed to get a MOLEX to SATA power connector. Once our card was working (little red LED), the Celsius 650 could see the hard drive. Here’s a photo of the IDE to SATA connector in situ in IDE1:
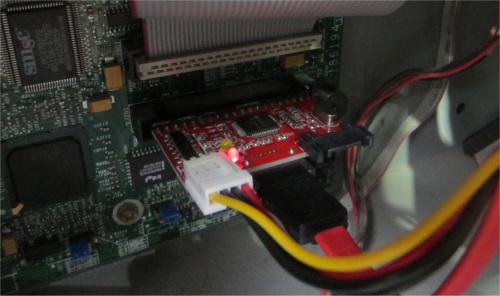
SATA controller card in a Fujitsu Siemens Celsius 650 desktop
The drive was now installed and correctly identified by the BIOS. The next problem, is that it failed to boot.
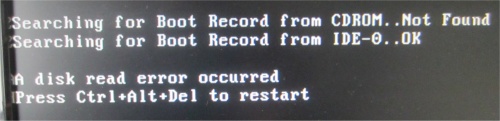
Disk error with Windows XP booting on a SATA drive
Installing Windows XP on a SATA drive
I was unable to get the SATA drive going. My investigation suggested the following, which I tried to no avail. It’s here in case it helps anyone.
My research showed that the next problem is that Windows XP installation CDs don’t include the required SATA drivers needed to allow installation on a SATA drive. The work-around for this is to rebuild a Windows XP boot CD that includes the required SATA drivers. The process is called Slipstreaming, and the instructions here worked a treat for burning a CD ROM with Windows XP and the SATA drivers: How to slipstream your SATA drivers into a Windows XP installation.
Summary
This page should hope you to get past the BIOS password, and tell you what I tried to get the SATA working. Sorry not to have not a good conclusion at the end, but hopefully this has helped.
One Response to Fujitsu Siemens Celsius 650 Hard Drive Help